


To change opacity in Google Slides, select an image, open Format > Format options > Adjustments, and drag the Opacity slider. For a shape, click Fill color, add a Custom color, and drag the transparency slider.
Google Slides has no single opacity or transparency control. The setting is in a different place for images, shapes, text, and backgrounds, and some objects have no setting at all.
This guide gives the exact menu path for each object, the workarounds for the gaps, and the limits of the mobile app.
Where the Opacity Setting Is for Each Object
Use this table to find the right control. The paths are for Google Slides in a browser on a computer.
| Object | Menu path | Control |
|---|---|---|
| Image or GIF | Format > Format options > Adjustments | Opacity slider |
| Shape fill | Fill color > Custom > Add | Transparency slider, A box |
| Shape border | Border color > Custom > Add | Transparency slider, A box |
| Word art | Fill color > Custom > Add | Transparency slider, A box |
| Slide background color | Slide > Change background > Color > Custom > Add | Transparency slider |
| Regular text | None | Use Word art or a lighter color |
| Slide background image | None | Insert as a normal image |
| Video | None | No workaround |
We checked the image, background, and keyboard paths against Google's Docs Editors Help in October 2026.
What is Opacity in Google Slides
Opacity is the degree of transparency of an object.
At 100%, the object is solid. At 0%, it disappears.
Turn the slider down to fade a background shape, place a transparent box over an image, or dim everything except the element you want the audience to notice.
Opacity vs. Transparency
Opacity and transparency are the same setting, measured from opposite ends. Google Slides uses both words:
- The image slider on a computer is labeled Opacity.
- Google's help page for the Android app calls the same image setting transparency.
- The shape color window has a transparency slider. The box next to it is labeled A, for alpha.
To convert one to the other, subtract from 100.
| Opacity | Transparency | Result |
|---|---|---|
| 100% | 0% | Solid |
| 75% | 25% | Slightly see-through |
| 50% | 50% | Half see-through |
| 25% | 75% | Faint |
| 0% | 100% | Invisible |
The A box in the shape color window counts like opacity. A higher number makes the shape more solid.
Step-by-Step Guide to Changing Image Opacity
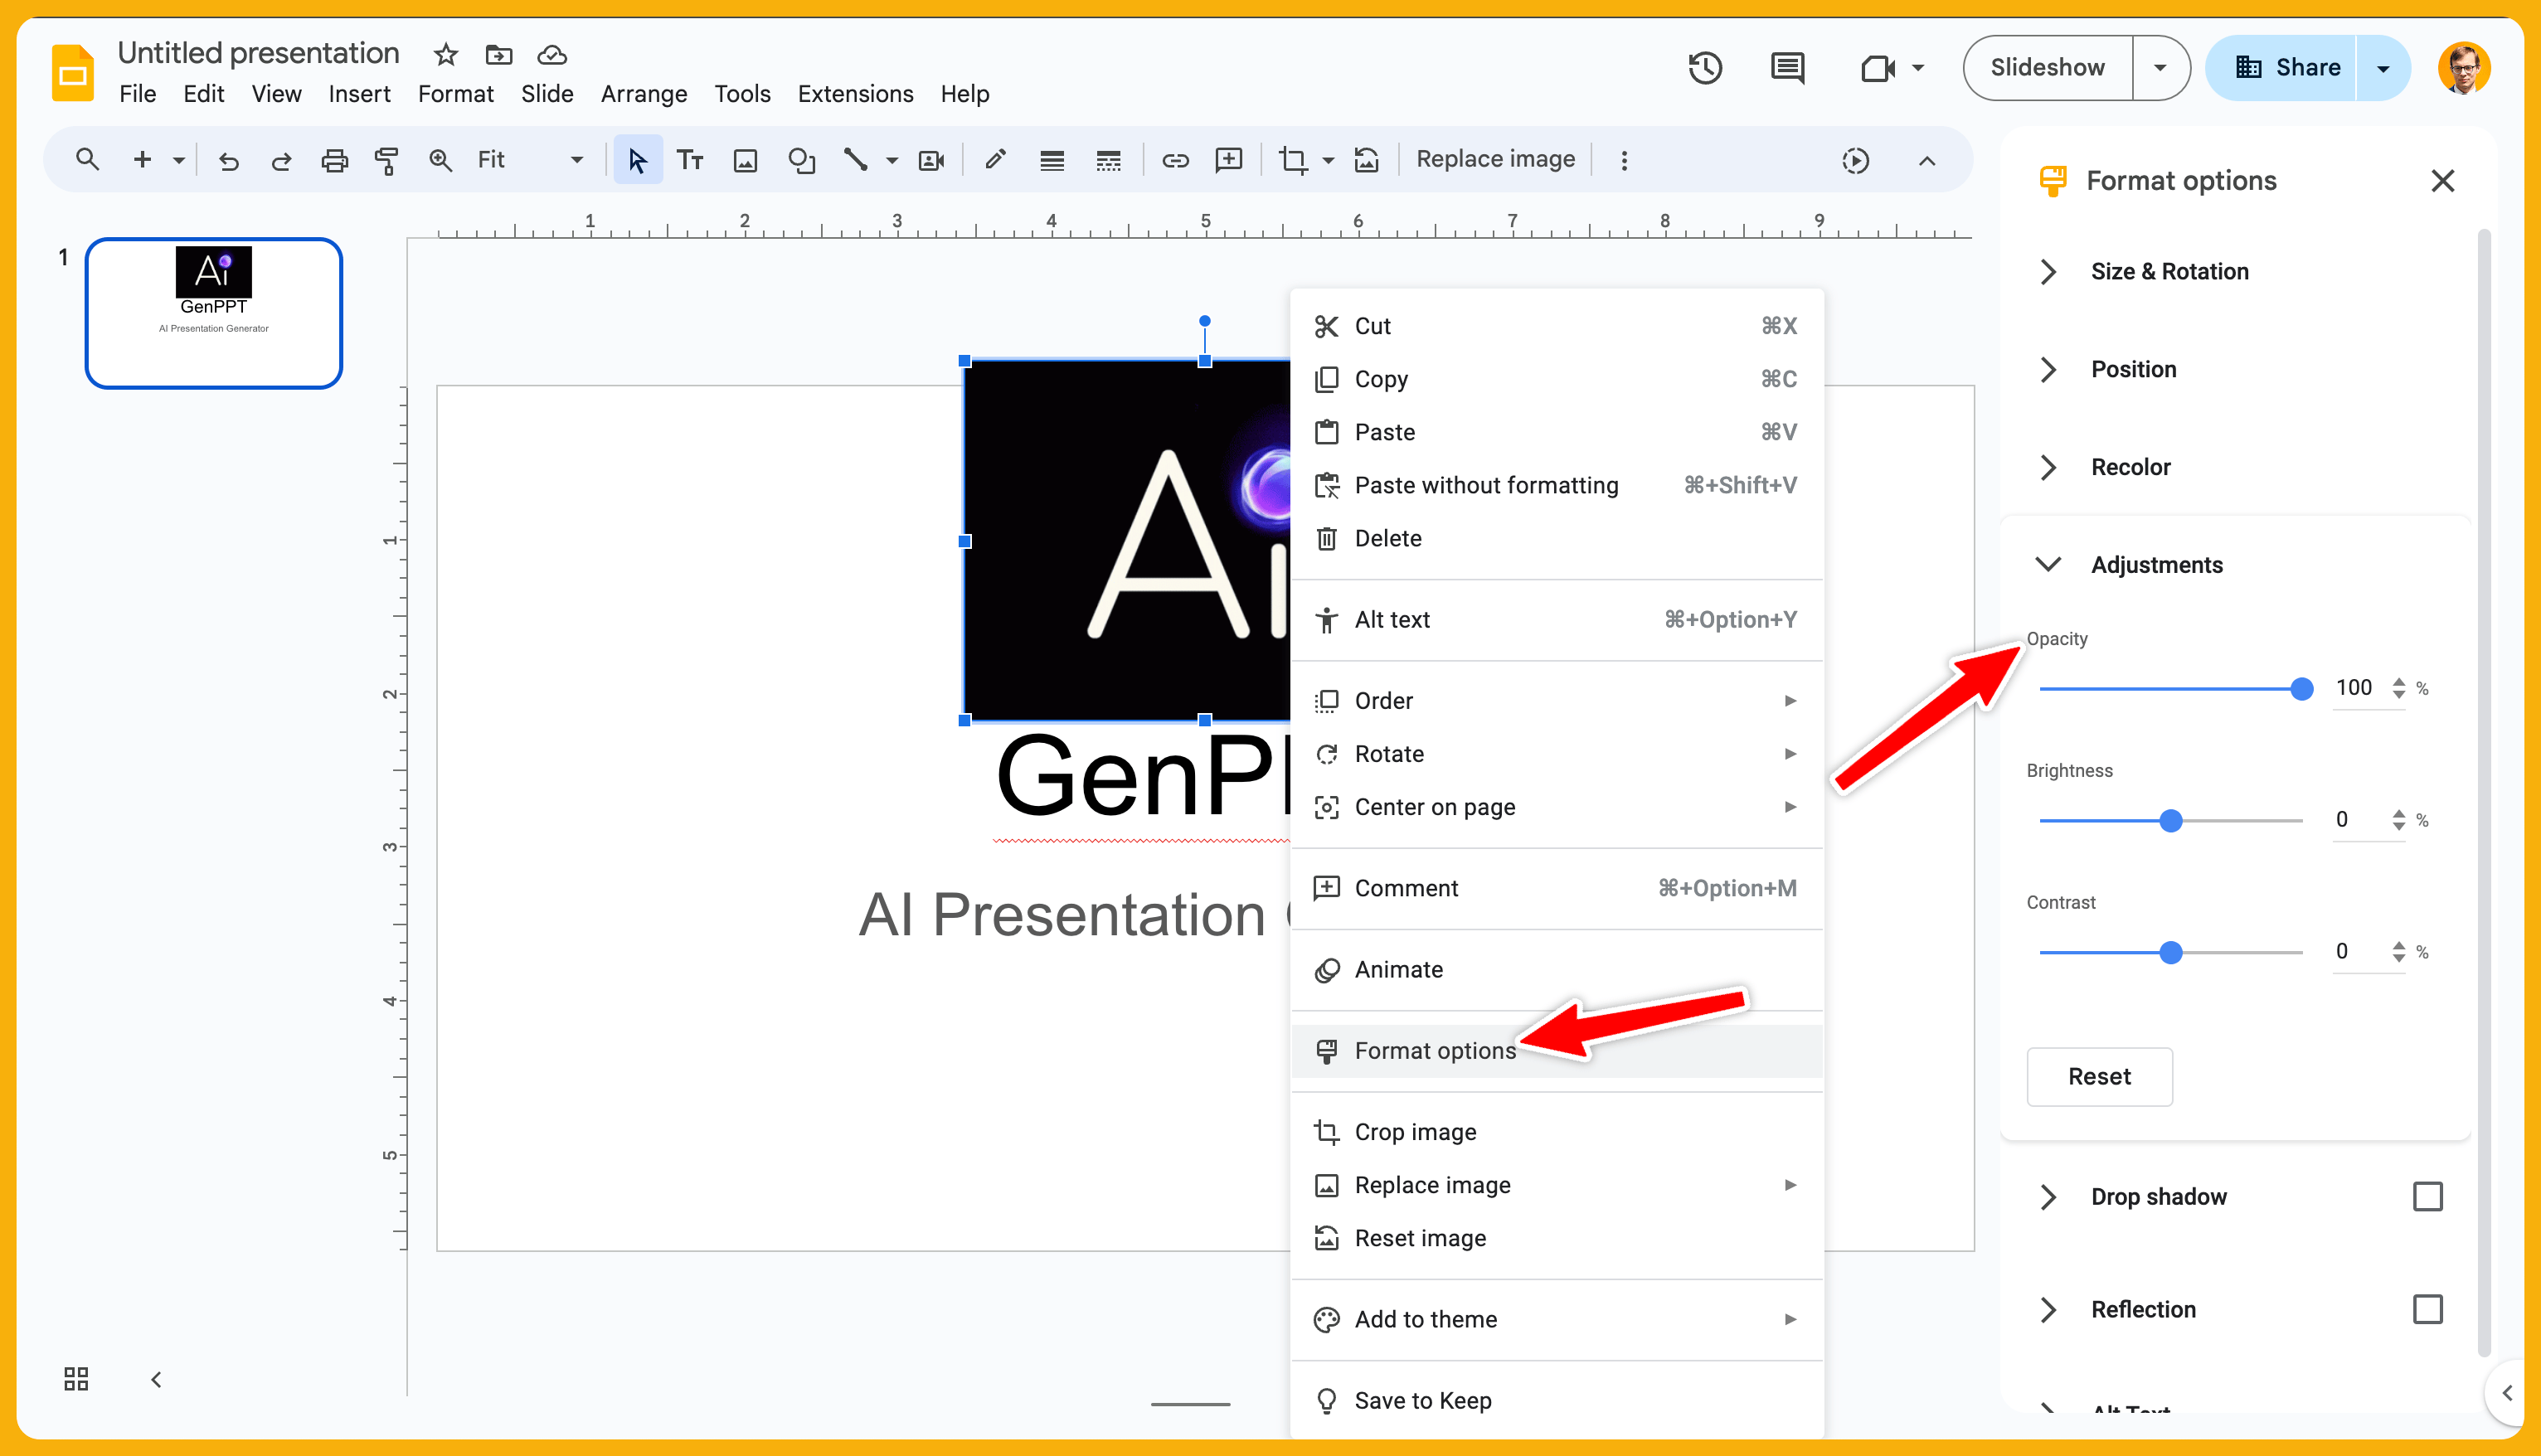
Adjust the opacity of an image or GIF in your Google Slides presentation:
- Open your Google Slides presentation in a browser on a computer.
- Click the image or GIF you want to modify.
- Right-click the image and select Format options. You can also click Format > Format options in the top menu.
- In the sidebar on the right, click Adjustments to open it.
- Find the Opacity slider. It starts at 100%.
- Drag the slider to the left to decrease opacity, or type a number in the box next to it.
Google Slides applies the change as you drag. The Adjustments section also holds the Brightness and Contrast sliders.
The slider fades the whole image evenly. It cannot fade only one area of a picture.
To make only the background of a picture transparent, click the image and select Edit image > Remove background. Google's help page says this feature requires an eligible Google Workspace or Google One AI Premium subscription.
How to Reset Image Opacity
To set only the opacity back, type 100 in the Opacity box.
To set opacity, brightness, and contrast back together, click Reset under the three sliders.
To remove every edit, right-click the image and select Reset image. This returns the image to the original file you added, so it also removes crops and recolors.
When to Lower Image Opacity
Lower the opacity when a picture competes with the text on top of it:
- A full-slide photo behind a title.
- A logo used as a watermark in a corner.
- A screenshot that supports the point but is not the point.
If you would rather not build these layers by hand, GenPPT designs full slides from a prompt, a PDF, or a document. It exports a .pptx file that opens in Google Slides.
How to Change Shape Opacity
Change opacity on rectangles, squares, stars, circles, and other shapes:
-
Open your Google Slides presentation.
-
Select the shape you want to modify.

-
In the toolbar, select the Fill color (paint bucket icon).
-
Under Custom in the popup, click Add (the plus icon). A color window opens.
-
Drag the transparency slider to the left to reduce the opacity. It is the lower of the two sliders.
-
Or change the A (alpha) value next to the Hex and RGB boxes. 100 is solid and 0 is invisible.

-
Click OK.
The transparency slider is only in this color window. The color swatches in the first popup are always solid.
Google Slides saves the new color under Custom in the palette. To use the same transparency on another shape, select the shape and click that saved color.
For overlay, watermark, and highlight examples, read how to make a shape transparent in Google Slides.
Make a Shape Fully Transparent
Select the shape, click Fill color, and click Transparent at the bottom of the palette.
The fill disappears. The border and any text in the shape stay visible.
Change the Border Opacity
The fill setting does not change the border. To fade the outline:
- Select the shape.
- Click Border color (the pencil icon next to Fill color).
- Under Custom, click Add.
- Drag the transparency slider and click OK.
To remove the outline, click Border color > Transparent.
Lines and arrows have no fill. Change their color with the same pencil icon.
Fade a Shape with a Gradient
A gradient lets one side of a shape be solid and the other side be see-through. This is useful for a dark band behind a title on a photo.
- Select the shape and click Fill color.
- Open the Gradient tab and click Custom.
- Click a gradient stop, click its color circle, and choose Custom. Set the transparency in the color window.
- Do the same for the other stop, then click OK.
Google's help pages do not document the gradient window. These steps follow the SlidesCarnival gradient guide, so the labels in your version may differ.
How to Change Text Transparency in Google Slides
Regular text in a text box has no transparency slider. Google's Slides API reference defines a text color as fully opaque or fully transparent, with nothing between.
You have three options.
Option 1: Use Word Art
Word art behaves like a shape, so it takes a transparent fill.
- Click Insert > Word art.
- Type your text and press Enter.
- With the Word art selected, click Fill color.
- Under Custom, click Add, drag the transparency slider, and click OK.
- Click Border color to fade or remove the outline.
Use Word art for a title, a large number, or a watermark such as DRAFT. It is not practical for paragraphs.
Option 2: Choose a Lighter Text Color
On a plain background, a lighter tint looks the same as lower opacity.
Select the text, click Text color, and pick a gray instead of black. The text stays solid, so it does not show a photo behind it.
Option 3: Fade the Text Box, Not the Text
Most of the time you want readable text on a photo, not faded text.
Select the text box, click Fill color > Custom > Add, choose a dark or light color, and drag the transparency slider to the left. The box becomes see-through and the text stays solid.
How to Change Background Image Opacity
Slide > Change background has two settings: Color and Image.
A background color can be transparent. Click the Color box, click Add under Custom, and use the transparency slider.
A background image has no opacity control, and you cannot select it on the slide. Use one of these two workarounds.
Workaround 1: Insert the Picture as a Normal Image
- Click Insert > Image and choose your picture.
- Resize it to cover the slide.
- Right-click it and select Format options > Adjustments. Lower the Opacity.
- Right-click it again and select Order > Send to back.
To repeat the faded image on every slide, click Slide > Edit theme and do the same steps on the layout your slides use.
Workaround 2: Put a Color Overlay on Top
Keep the background image at full strength and dim it with a shape.
- Click Insert > Shape > Shapes and draw a rectangle over the whole slide.
- Click Fill color > Custom > Add. Choose black for white text, or white for dark text.
- Drag the transparency slider to the left until the photo shows through and the text is still easy to read. Click OK.
- Click Border color > Transparent.
- Right-click the rectangle and select Order > Send to back. It stays above the background image and below your content.
How to Change Opacity in the Google Slides Mobile App
The mobile apps do less than the browser version. This table follows Google's help pages.
| Task | Android | iPhone and iPad |
|---|---|---|
| Image opacity | Yes | Use a computer |
| Shape transparency slider | Not documented | Not documented |
| Show transparency set on a computer | Yes | Yes |
Android
Google's help page for Android gives these steps for an image:
- Open the presentation in the Google Slides app.
- Tap the image.
- At the top, tap Format.
- Tap Adjustments and change the transparency, brightness, or contrast.
- Tap anywhere else on the slide to close.
App versions differ. Android Police reported in March 2024 that the Adjustments button is in the bottom toolbar and that the slider is labeled Opacity.
iPhone and iPad
Google's help page for iPhone and iPad says to adjust image colors on a computer at slides.google.com.
The same Android Police guide reports that the iOS app has the same Adjustments button as the Android app. Google's help page does not confirm this, and we did not test it. If you do not see the button, use a computer.
Shapes on Mobile
Google's help pages list no transparency control for shape fills in the apps. Third-party guides report that the mobile palette lets you choose a color but not a custom transparency.
Set shape transparency in a browser on a computer. The shape keeps the setting when you open the file on your phone.
Keyboard Path to the Opacity Setting
Google Slides has no keyboard shortcut for opacity. You can reach the setting without a mouse:
- Click the slide, then press Tab until the object is selected.
- Open the tool finder. Press Alt + / on Windows or ChromeOS, or Option + / on Mac.
- Type Format options and press Enter. The sidebar opens.
- Open Adjustments and type a number in the Opacity box.
These shortcuts from Google's shortcut list help with layered objects:
| Action | Windows or ChromeOS | Mac |
|---|---|---|
| Select the next object | Tab | Tab |
| Open the tool finder | Alt + / | Option + / |
| Open the Format menu | Alt + O (Chrome) | Ctrl + Option + O |
| Open the right-click menu | Shift + F10 | Shift + F10 |
| Send to back | Ctrl + Shift + Down arrow | Cmd + Shift + Down arrow |
| Ungroup | Ctrl + Alt + Shift + G | Cmd + Option + Shift + G |
Opacity Values to Start With
These values are our suggested starting points, not rules or measured data. Change them until the text is easy to read in Slideshow mode.
| Use | Control | Start at |
|---|---|---|
| Dark overlay on a photo, white text on top | Shape fill | 40 to 60% opacity |
| Photo behind text | Image opacity | 20 to 35% |
| Watermark or logo | Image opacity | 10 to 20% |
| Highlight box over a chart or screenshot | Shape fill | 20 to 30% opacity |
| Dim the slide around one item | Black shape fill | 60 to 70% opacity |
For a fixed target, use the contrast rule from the W3C accessibility guidelines: a contrast ratio of at least 4.5:1 for normal text and 3:1 for large text.
Projectors and shared screens wash out faint objects. Check the slide on the screen you will present on. For more layout rules, see these presentation design tips.
What You Cannot Change in Google Slides
These objects have no opacity or transparency setting:
- Regular text and highlight color. Use Word art or a lighter color.
- A slide background image. Insert the picture as a normal image.
- Videos. Google's help page lists playback options for a video, and no opacity setting.
- One area of an image. The Opacity slider fades the whole picture. Remove background is a different tool and needs an eligible subscription.
- Images and shapes with one control. Set images in Format options and shapes in Fill color.
- Opacity as an animation. Google's animation help lists no setting that moves an object to a set opacity level.
PowerPoint covers one of these gaps. Its Format Background pane has a Transparency bar for a background picture, according to Microsoft's support page. If you choose between the two apps, see Google Slides vs. PowerPoint.
Troubleshooting Common Issues
If opacity won't change on a shape:
- Adjust the fill color, not the border color.
- Ungroup complex shapes or logos before you change opacity on each piece. The shortcut is Ctrl + Alt + Shift + G on Windows or Cmd + Option + Shift + G on Mac.
If you cannot find the control:
- The sidebar has no Adjustments section. You selected a shape, a text box, or a video. Adjustments is for images only. For a shape, use Fill color.
- The palette has no transparency slider. The slider is in the custom color window. Under Custom, click Add.
- You cannot select the picture. It is the slide background. Follow the steps in How to Change Background Image Opacity.
- The options are missing or gray. You have view or comment access. Ask the owner for edit access.
- You are in the mobile app. Open the file in a browser on a computer.
If the result looks wrong:
- The shape still looks solid. There is nothing behind it, or the object behind it has the same color. Move the shape over an image to check.
- The text is hard to read. Raise the overlay opacity or lower the image opacity. Then check the slide in Slideshow mode.
Conclusion
Opacity controls how your audience reads hierarchy on a slide.
Remember two paths. For an image, use Format options > Adjustments > Opacity. For a shape, use Fill color > Custom and the transparency slider.
Run through the image and shape steps on backgrounds, overlays, and accent shapes until foreground and background separate on screen.
If you want the layout done for you, GenPPT researches your topic and drafts an outline for you to approve. You pick a visual concept, and the designed slides are ready about 2 to 3 minutes later. You then change slides in chat and export to .pptx or PDF.
The slides are image-native designs, so you edit them in GenPPT and not shape by shape in Google Slides. Check the numbers and claims yourself.
GenPPT has no free plan. The trial costs $1 for 3 days of full access and needs a card. After that, it is $25 per month or $99 per year.
See pricing, or read how to convert PowerPoint to Google Slides to open the export there.
FAQ
Can you change opacity in Google Slides?
Yes, for images, shapes, Word art, and background colors. Images use Format options > Adjustments > Opacity. Shapes use Fill color > Custom and the transparency slider. Regular text, videos, and slide background images have no opacity setting.
How do I change the opacity of a shape in Google Slides?
Select the shape and click Fill color in the toolbar. Under Custom, click Add, then drag the transparency slider or type a value in the A box. Click OK to apply it.
How do I make an image 50% transparent in Google Slides?
Right-click the image and select Format options. Open Adjustments and type 50 in the box next to the Opacity slider. 50% opacity and 50% transparency are the same result.
How do I change the opacity of a background image in Google Slides?
You cannot change it directly. Insert the picture with Insert > Image, lower its opacity in Format options > Adjustments, and select Order > Send to back. You can also put a semi-transparent rectangle over the background.
Can you make text transparent in Google Slides?
Not regular text. A text color is either solid or fully transparent. For see-through text, use Insert > Word art, add a custom fill color, and drag the transparency slider to the left.
Why is there no transparency slider for my shape?
The slider does not show in the first color palette. Click Fill color, then click Add under Custom to open the color window that has the slider. If you are in the mobile app, change to a browser on a computer.
Can I change opacity in the Google Slides app on a phone?
On Android, tap the image, tap Format, then tap Adjustments. Google's help page for iPhone and iPad says to adjust images on a computer. For shape transparency, use a computer on both platforms.