
Ever get that sinking feeling mid-presentation when you realize you’re either rushing or running way over time? Adding a timer to your slides is a game-changer for keeping your talk on track. It's your secret weapon for nailing that Q&A session, managing group activities, or just finishing on time.
A well-placed timer does more than just count down. It’s a simple tool that helps you deliver a smooth, professional, and stress-free presentation, every single time. It keeps you honest with your schedule so you don't spend too long on one section only to blitz through the rest.
This small addition transforms your whole dynamic. Instead of guessing how much time is left, you and your audience get a clear, visual cue. That shared understanding builds confidence and keeps everyone locked in.
Keep Your Audience Hooked
Timers are also fantastic for cranking up engagement. When you pop a five-minute clock on the screen for a group activity, it injects a real sense of purpose and urgency. That little bit of structure keeps everyone on task and makes those interactive moments count.
A visible timer isn’t just for you; it’s a non-verbal contract with your audience. It shows you respect their time and came prepared.
The need for precise time management isn't just a feeling. The global market for presentation remotes with built-in timers hit roughly USD 1.42 billion, which shows how much presenters rely on perfect timing.
So, how do you actually get a timer onto your slide? Let's look at a few ways to do it.
Choosing Your PowerPoint Timer Method
| Method | Best For | Difficulty Level | Key Feature |
|---|---|---|---|
| Animation Tricks | Quick, simple visual countdowns without extra software. | Easy | Uses PowerPoint's built-in animation features. |
| Embedded Video | Highly visual, "set-it-and-forget-it" timers. | Easy | Just insert a pre-made video file. |
| Add-ins | Feature-rich, customizable, and interactive timers. | Medium | Requires installing a third-party tool. |
| VBA Macros | Fully automated and precise timers for advanced users. | Hard | Needs coding knowledge but offers total control. |
| Presenter View | A private, built-in clock just for the speaker. | Easy | No visible timer for the audience. |
This table should give you a solid starting point. If you just need a simple visual cue, animations are your best bet. But if you need something more robust for a workshop, an add-in might be the way to go.
This decision tree gives you a visual guide for picking the right path.
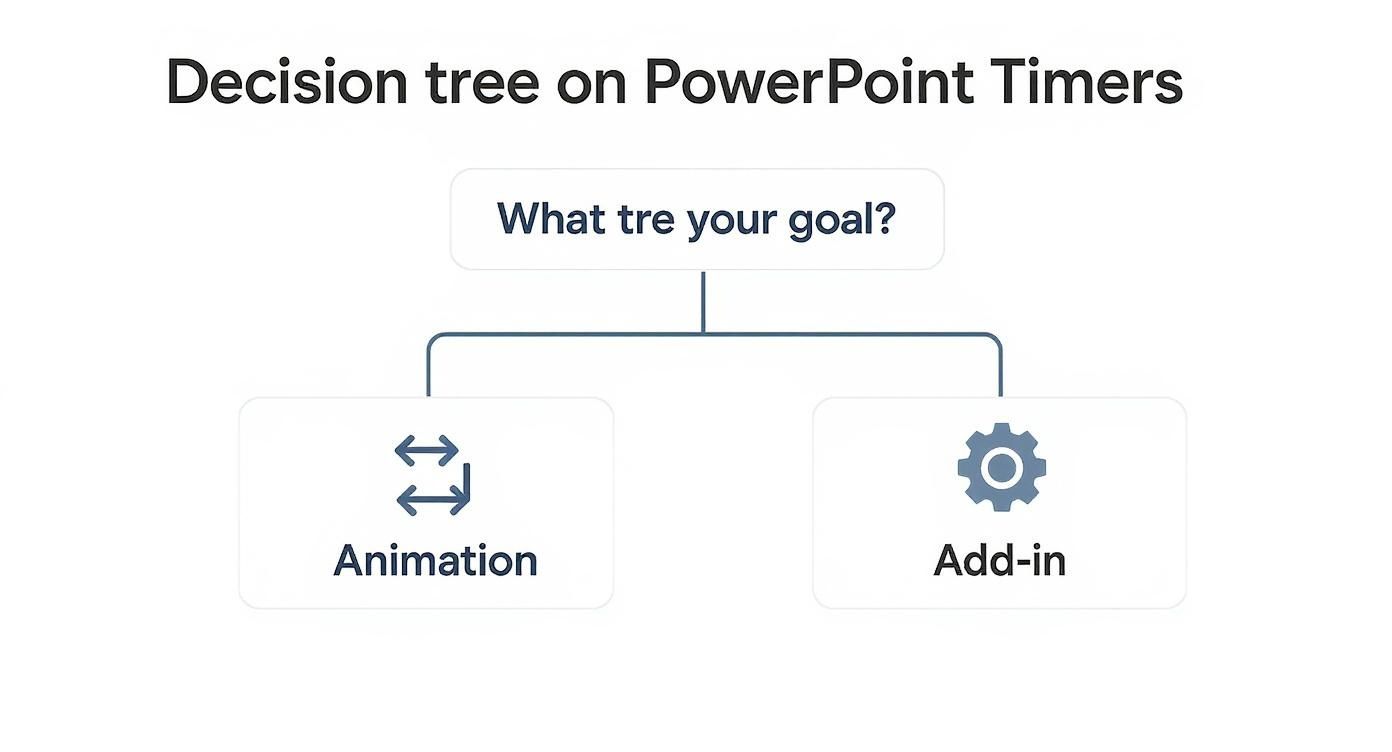
As you can see, the best method really depends on your goal. Simple animations are perfect for basic needs, while add-ins give you far more control for complex situations. It’s all about creating a seamless experience for you and your audience. To dive deeper into the psychology, explore these strategies for creating countdown timers that convert.
Ready to build one? Let's walk through exactly how to set up a timer in PowerPoint using each of these methods.
Use Animations for a Simple Countdown
If you want to keep your presentation clean without messing with external files or add-ins, I've got good news. You can build a surprisingly effective timer using the animation tools already baked into PowerPoint. It’s a no-fuss solution that works on any computer running the software.
It's perfect for timing short activities, speaker transitions, or interactive Q&A sessions without any drama.
Let’s walk through how to create a simple 5-second countdown timer. The magic is in layering shapes and timing their exit animations perfectly. Once you get this technique, you can easily adapt it for any duration you need.

Setting Up Your Countdown Shapes
First, you need to create the visual pieces for your timer. These will be the numbers that disappear one by one.
Go to the Insert tab and select Shapes. Pick a circle, a square, or any shape that fits your deck's aesthetic. Draw your first shape on the slide.
Next, right-click the shape and choose Edit Text. Type the number "5" into it. Now, format the text and shape colors to match your presentation's theme. Get it looking just right, because you're about to duplicate it.
Once you’re happy with how it looks, copy and paste it four more times (Ctrl+C and Ctrl+V or Cmd+C and Cmd+V). Change the text in the new shapes to "4," "3," "2," and "1." You should now have five separate shapes.
Layering the Numbers Correctly
This next part is key. You need to stack all five shapes directly on top of each other. The order is critical: "5" has to be on top, and "1" needs to be at the bottom.
Here's an easy way to do it. Select all five shapes. Then, go to the Shape Format tab, click Align, and choose both Align Center and Align Middle. This will stack them flawlessly.
To double-check the order, open the Selection Pane (found under the Home tab > Arrange > Selection Pane). Just make sure the shape with "5" is at the top of that list.
Now you have a single stack of shapes on your slide, with the number "5" visible. It's time to bring them to life.
Applying the Disappearing Act
The effect we're going for is simple: each number appears for one second, then vanishes to reveal the next. You'll pull this off with exit animations.
- Open the Animation Pane: Go to the Animations tab and click Animation Pane. This panel is your command center for everything that moves.
- Animate the Top Number: Select the shape with the number "5." In the Animations tab, look for the red Exit Effects and choose Disappear.
- Animate the Rest: Repeat that for the other four shapes ("4," "3," "2," and "1"). Apply the same Disappear exit animation to each one.
At this point, all your shapes have an animation, but they'd all disappear at once. Let's fix that.
Fine-Tuning the Animation Timing
This is where you turn a pile of animations into a real countdown. In the Animation Pane, you’ll see the five "Disappear" effects you just applied. Let's set them up to run one after another, automatically.
- Start the Timer: In the Animation Pane, find the animation for your number "5." Right-click it and under Start, choose With Previous. This makes the timer kick off the moment you land on the slide.
- Set the Delay: With the "5" animation still selected, find the Timing section in the Animations tab. Set the Delay to 01.00 seconds. This tells PowerPoint to wait one second before the "5" disappears.
- Chain the Animations: Next, select the animation for the number "4." This time, set its Start to After Previous. Do the same for numbers "3," "2," and "1." This creates a chain reaction where each number vanishes after the one before it.
By setting each number's animation to "Start After Previous," you're creating a domino effect. The disappearance of "5" triggers the one-second countdown for "4," and so on. It creates a seamless, automatic timer.
Your Animation Pane should now show a neat waterfall of effects. When you pop into Slide Show mode, the number "5" will show for one second, then disappear to reveal "4." You’ve just managed to insert a timer in PowerPoint using nothing but its built-in tools.
Embed Video Timers for a Professional Look
If you're aiming for a polished countdown that looks professionally produced, embedding a video is your best bet. Forget building timers with animations. This method is all about finding a great-looking timer online and dropping it into your slide.
This approach gives your presentation an immediate visual upgrade. It’s perfect for setting an energetic tone, managing break times, or counting down to a big reveal. The best part? There are thousands of high-quality, pre-made countdown videos available online, many for free.
Finding and Inserting Your Video Timer
First, you need to find the right video. A quick search on platforms like YouTube for terms like "5 minute countdown timer" will give you plenty of options. Just look for one that matches the style of your presentation.
Once you've found the perfect clip, you have two main ways to get it into your deck.
- Insert Online Video: If you know you'll have a rock-solid internet connection, this is the easiest route. Go to the Insert tab, click Video, and select Online Videos. Paste the URL of your chosen YouTube video, and PowerPoint will embed it directly onto your slide.
- Insert Video from Your PC: For total peace of mind, download the video file first. Once it's on your computer, go to Insert > Video > This Device. Navigate to your file, and it will be fully embedded. This is the safest option, as it ensures your timer will work anywhere, anytime—no Wi-Fi required.
Configuring Your Timer to Play Automatically
Just dropping the video onto your slide isn't enough. You need to tell PowerPoint when and how to play it so it feels like a seamless part of your show. This is where the Playback tab comes in.
After you insert the video, a new Playback tab will appear in the ribbon. The most important setting here is the Start option. By default, it's set to "In Click Sequence," meaning you have to click to start the timer.
To make your timer hands-free, change the Start setting from "In Click Sequence" to "Automatically." This small tweak makes a huge difference. Now, as soon as you advance to that slide, your timer will kick off without you doing a thing.
This automatic playback is what gives the video method such a professional feel. It creates a smooth, uninterrupted flow that keeps you and your audience focused.
Polishing the Look and Feel
Finally, make sure the video integrates cleanly with your slide's design.
- Resize and Position: Click and drag the corners of the video to resize it. You can make it a small timer tucked into the corner or a full-screen, high-energy countdown.
- Frame and Style: Check out the Video Format tab for more options. You can add a border, apply a soft edge effect, or even crop the video to fit a specific shape.
- Trim the Video: If your video has extra fluff at the beginning or end, use the Trim Video tool in the Playback tab. This lets you snip it down to just the countdown you need.
By taking a moment to dial in these settings, you can insert a timer in PowerPoint that not only keeps you on schedule but also adds a layer of polish that elevates your entire presentation.
Unlock Advanced Timers with PowerPoint Add-ins
When built-in animations and embedded videos just don't cut it, it's time to call in the specialists: PowerPoint Add-ins. Think of them as mini-apps that plug directly into PowerPoint, giving you powerful features that aren't available out of the box.
For timers, this means gaining serious control. We're talking about the precision you need for a structured workshop or a high-stakes webinar. Add-ins open up a world of possibilities, like stopwatches that count up, persistent timers that run across multiple slides, or visual progress bars.

How to Find and Install a Timer Add-in
Getting started with add-ins is surprisingly simple. Microsoft integrated its official store right into PowerPoint, so you don't have to hunt for downloads on sketchy websites.
Here’s how to find what you need:
- Go to the Insert tab on the PowerPoint ribbon.
- Click the Get Add-ins button to launch the Office Add-ins store.
- In the search bar, type "timer" and hit Enter.
You’ll see a list of timer add-ins, both free and paid. Take a moment to read the descriptions and user reviews to find one that fits your needs. Once you choose, just click the Add button. The add-in will be installed and ready to go.
Configuring Your New Timer
After installation, your new timer will usually show up in the Insert tab. From there, you can drop it right onto your slide. The real magic, though, is in the settings menu.
This is where add-ins truly shine. You can fine-tune every detail:
- Set Custom Durations: Need a 30-second rapid-fire round or a 20-minute breakout session? Just type it in.
- Choose Your Timer Type: Easily switch between a classic countdown, a count-up stopwatch, or a progress bar.
- Customize the Look: Match your presentation's branding by changing the colors, fonts, and size.
- Add Sound Alerts: Set up a chime to signal when time is up, getting everyone’s attention without you saying a word.
The market for these precise tools is bigger than you might think. Valued at $1,275.62 million in 2021, it's projected to hit $1,741.9 million by 2025. You can read more about this trend toward reliable timekeeping solutions on cognitivemarketresearch.com.
A Comparison of Popular PowerPoint Timer Add-ins
Not all add-ins are built the same. Some are simple, while others are packed with features for pro trainers. Here’s a breakdown of a few options to help you choose.
| Add-in Name | Key Features | Pricing Model | Ideal Use Case |
|---|---|---|---|
| Easy Timer | Simple countdown and count-up functionality. Clean interface. | Free | Quick, no-fuss timers for classroom activities or informal meetings. |
| Breaktime | Pre-set timers (5, 10, 15 min) with progress bars. | Freemium | Managing breaks during workshops or all-day training sessions. |
| Slide-Clock | Displays the current time or a timer that persists across all slides. | Paid | Webinars or long presentations where a constant time check is needed. |
Ultimately, the best tool depends entirely on your goal.
For a simple five-minute activity, a freebie like Easy Timer is perfect. But if you’re running a professional workshop and need a timer that stays visible as you switch slides, investing in a tool like Slide-Clock is a smart move.
Choosing to insert a timer in PowerPoint via an add-in is about gaining control. It automates your time management, freeing you up to focus on delivering your message. And if you’re looking for other ways to get presentations done faster, tools like GenPPT can help build your entire deck from a single prompt.
Build a Custom Timer with VBA and AI Tools
When standard animations and add-ins aren't enough, it’s time to get your hands dirty. For total control over how your timer looks and behaves, you can turn to VBA (Visual Basic for Applications)—the powerful scripting language baked into PowerPoint.
Don't let the word "coding" scare you. This approach is more accessible than you think and opens up a world of possibilities. Imagine a timer that doesn't just count down but also triggers other animations on your slide. This is how you create a truly dynamic presentation.
We'll start with a simple script you can copy and paste directly.
Getting Started with a Simple VBA Timer
First, you need to open the VBA editor. The quickest way is to press Alt + F11 on your keyboard (or Fn + Alt + F11 on some laptops). This brings up a new window where the code for your presentation lives.
Next, you need a place to put your script. In the VBA editor menu, go to Insert > Module. This opens a blank white window where the magic happens.
Now, copy the code below and paste it directly into that module window:
Sub CountdownTimer()
    Dim SlideNum As Integer
    Dim Time As Integer
    Dim TimerDisplay As Shape

    SlideNum = 1 'Change this to the slide number where you want the timer
    Time = 10 'Set the countdown duration in seconds

    Set TimerDisplay = ActivePresentation.Slides(SlideNum).Shapes.AddTextbox(msoTextOrientationHorizontal, 400, 200, 200, 100)
    TimerDisplay.TextFrame.TextRange.Text = Time
    TimerDisplay.TextFrame.TextRange.Font.Size = 80

    Do While Time > 0
        TimerDisplay.TextFrame.TextRange.Text = Time
        DoEvents
        Application.Wait Now + TimeValue("00:00:01")
        Time = Time - 1
    Loop

    TimerDisplay.TextFrame.TextRange.Text = "Time's Up!"
End Sub
To run it, click the green "Play" icon (or press F5) while your cursor is inside the code. PowerPoint will instantly jump to the slide you specified, create a text box, and start counting down from 10. Just like that, you've built a functional timer from scratch.
The Rise of Smart and AI-Powered Timers
While VBA gives you granular control, the next frontier is all about AI. These emerging tools go beyond a simple countdown, acting more like a co-pilot to help you manage your pacing in real time.
For truly unique visuals, you can even use an AI video generator from text to create custom countdown videos that perfectly match your presentation's theme.
These new AI-powered timers are changing how we think about presentation flow. One study found that speakers using AI-integrated timing tools maintained their target pace 30% more effectively. You can read more about these hidden secrets of AI in PowerPoint timers on ubitimer.com.
These tools don't just count seconds; they analyze your rhythm. If you're lingering too long on one point, they can give you a subtle nudge to keep things moving, ensuring you cover everything without rushing at the end.
This shift toward intelligent assistance is part of a bigger trend. If you enjoy scripting, learning how to automate PowerPoint slides can unlock even more advanced ways to create unforgettable presentations.
Whether you stick with VBA or jump into AI tools, you're taking a huge step toward mastering your delivery. A custom timer gives you the confidence to focus on your audience instead of the clock.
Common Questions About PowerPoint Timers
Got a few lingering questions about getting your PowerPoint timer just right? You're not alone. I’ve seen presenters run into the same hitches time and again.
Let's walk through the most common issues so you can get back to nailing your presentation.
Can I Make a Timer Run Across Multiple Slides?
This is tricky with PowerPoint's built-in tools. Both animation and video timers are stuck to the slide they're on, so they restart every time you advance.
If you need a continuous timer that keeps ticking as you move through your deck, your best bet is a dedicated PowerPoint Add-in. Many are designed for this exact scenario, letting you place a persistent timer that stays visible no matter which slide you're on.
The only other real alternative involves writing a custom VBA macro, but that's a much more technical path. For a seamless experience, an add-in is the way to go.
Why Won't My Animation Timer Start Automatically?
This is a classic PowerPoint problem, and the fix is almost always in the animation trigger settings. By default, animations are set to 'On Click,' which means they're just sitting there waiting for you.
Here's how to fix it:
- Open your Animation Pane.
- Find the very first animation in your countdown sequence.
- Right-click it and change the start option to 'Start With Previous'. This tells PowerPoint to kick things off the second the slide appears.
From there, just make sure every other animation in your countdown is set to 'Start After Previous'. This creates the automatic domino effect you're looking for.
Will My Video Timer Work on Another Computer?
It should, but with one critical condition: you have to embed the video, not just link to it. When you link a video, you’re just telling PowerPoint where the file is on your computer. If you move that presentation to a different machine, that link breaks.
Luckily, modern versions of PowerPoint typically embed videos by default when you use the Insert > Video > This Device option.
Want to be 100% sure? Go to File > Info. If you see a section called 'View Links to Files,' click it and make sure no video files are listed. If that area is empty, your video is fully embedded and ready to travel.
An embedded video is completely self-contained within your .pptx file. That makes your presentation portable and reliable, so you can stop worrying about broken links when you're on someone else's machine.
What Is the Best Timer for a Q&A Session?
For a Q&A, you need something big, bold, and impossible for the audience to miss. An embedded video timer or a dedicated timer from an add-in is perfect for this.
The best approach is to create a dedicated slide just for the Q&A. Place a 5 or 10-minute countdown timer right in the center. A visible clock helps manage everyone's expectations and gives you a professional way to signal when it's time to wrap up.
Managing your time is crucial, especially in short formats. We actually dig into this in our guide on how many slides you need for a 5-minute presentation. A pre-made video timer is often the fastest way to get a polished countdown for this exact purpose.